MySQL高可用集群之双主多从
简介
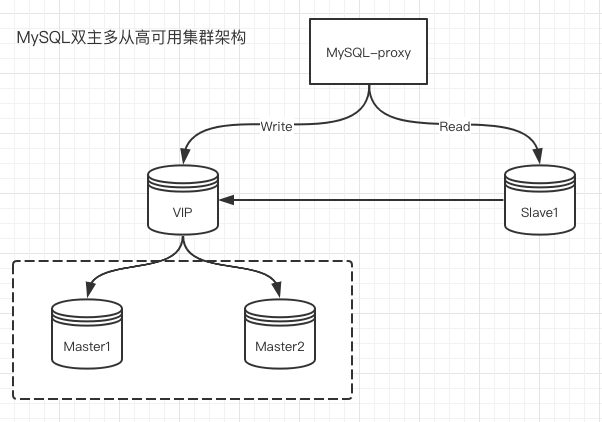
通常MySQL主从复制主要用来解决读写分离,分担服务器压力。MySQL互为主备实现服务的高可用;这里同时基于高可用和负载均衡。
集群架构
环境准备
| 主机名/角色 | VIP | IP地址 | 操作系统 | MySQL版本 |
|---|---|---|---|---|
| Node0/master1 | 172.16.10.100 | 172.16.10.10 | CentOS8.1.1911 | 8.0.17 |
| Node1/master2 | 172.16.10.11 | CentOS8.1.1911 | 8.0.17 | |
| Node2/slave1 | 172.16.10.12 | CentOS8.1.1911 | 8.0.17 |
注意
MySQL版本保持一致,不然容易出现不可预知的错误。
安装MySQL
在所有节点上安装MySQL
1dnf -y install mysql mysql-server
在master节点上配置server-id并开启bin-log
 1vi /etc/my.cnf.d/mysql-server.cnf
 2[mysqld]
 3# 主数据库端ID号,全局唯一,通常用IP地址最后一位
 4server_id = 10
 5# 开启二进制日志
 6log-bin = mysql-bin
 7# 需要复制的数据库名,如果复制多个数据库,重复设置这个选项即可
 8binlog-do-db = test
 9# 将从服务器从主服务器收到的更新记入到从服务器自己的二进制日志文件中
10log-slave-updates
11# 控制binlog的写入频率。每执行多少次事务写入一次(这个参数性能消耗很大,但可减小MySQL崩溃造成的损失)
12sync_binlog = 1
13# 下面这两个参数非常重要
14# 这个参数一般用在主主同步中,用来错开自增值, 防止键值冲突,master2上面改为2
15auto_increment_offset = 1
16# 这个参数一般用在主主同步中,用来错开自增值, 防止键值冲突
17auto_increment_increment = 2
18# 二进制日志自动删除的天数,默认值为0,表示“没有自动删除”,启动时和二进制日志循环时可能删除
19expire_logs_days = 7
20# 将函数复制到slave
21log_bin_trust_function_creators = 1
运行mysql
1systemctl enable --now mysqld
配置双主集群
配置master1
在master1节点上创建replication用户
1create user replication@'172.16.10.%' identified by 'replication';
2grant replication slave on *.* to replication@'172.16.10.%';
3show master status;
4+------------------+----------+--------------+------------------+-------------------+
5| File             | Position | Binlog_Do_DB | Binlog_Ignore_DB | Executed_Gtid_Set |
6+------------------+----------+--------------+------------------+-------------------+
7| mysql-bin.000002 |      692 | test         |                  |                   |
8+------------------+----------+--------------+------------------+-------------------+
在master2上执行
 1CHANGE MASTER TO
 2 MASTER_HOST='172.16.10.10',
 3 MASTER_USER='replication',
 4 MASTER_PASSWORD='replication',
 5 MASTER_LOG_FILE='mysql-bin.000002',
 6 MASTER_LOG_POS=692;
 7
 8start slave;
 9
10show slave status\G
11*************************** 1. row ***************************
12               Slave_IO_State: Waiting for master to send event
13                  Master_Host: 172.16.10.10
14                  Master_User: replication
15                  Master_Port: 3306
16                Connect_Retry: 60
17              Master_Log_File: mysql-bin.000002
18          Read_Master_Log_Pos: 692
19               Relay_Log_File: node1-relay-bin.000002
20                Relay_Log_Pos: 322
21        Relay_Master_Log_File: mysql-bin.000002
22             Slave_IO_Running: Yes
23            Slave_SQL_Running: Yes
查看master2节点已经同步过来了。
配置master2
在master2上创建replication用户
1create user replication@'172.16.10.%' identified by 'replication';
2grant replication slave on *.* to replication@'172.16.10.%';
3
4show master status;
5+------------------+----------+--------------+------------------+-------------------+
6| File             | Position | Binlog_Do_DB | Binlog_Ignore_DB | Executed_Gtid_Set |
7+------------------+----------+--------------+------------------+-------------------+
8| mysql-bin.000002 |      692 | test         |                  |                   |
9+------------------+----------+--------------+------------------+-------------------+
在master1节点上配置主从同步
 1CHANGE MASTER TO
 2 MASTER_HOST='172.16.10.11',
 3 MASTER_USER='replication',
 4 MASTER_PASSWORD='replication',
 5 MASTER_LOG_FILE='mysql-bin.000002',
 6 MASTER_LOG_POS=692;
 7
 8start slave;
 9
10show slave status\G
11*************************** 1. row ***************************
12               Slave_IO_State: Waiting for master to send event
13                  Master_Host: 172.16.10.11
14                  Master_User: replication
15                  Master_Port: 3306
16                Connect_Retry: 60
17              Master_Log_File: mysql-bin.000002
18          Read_Master_Log_Pos: 692
19               Relay_Log_File: node0-relay-bin.000002
20                Relay_Log_Pos: 322
21        Relay_Master_Log_File: mysql-bin.000002
22             Slave_IO_Running: Yes
23            Slave_SQL_Running: Yes
尝试从master1节点写入表到test中
1create database test character set utf8;
2use test
3create table user(id int primary key auto_increment, username varchar(32), password varchar(128));
在master2节点查看
 1show databases;
 2+--------------------+
 3| Database           |
 4+--------------------+
 5| information_schema |
 6| mysql              |
 7| performance_schema |
 8| sys                |
 9| test               |
10+--------------------+
11
12use test
13show tables;
14+----------------+
15| Tables_in_test |
16+----------------+
17| user           |
18+----------------+
表已经同步过来了
尝试在master2节点插入数据
1insert into user(username, password) values('jerry', '123456');
在master1上查看
1select * from user;
2+----+----------+----------+
3| id | username | password |
4+----+----------+----------+
5|  1 | jerry    | 123456   |
6+----+----------+----------+
现在master1和master2已经互为主从了。我们希望就是其中一个节点挂了不影响业务的正常运行。这里使用keepalived+lvs方案
安装lvs
在2个master节点上安装
1dnf -y install ipvsadm
安装keepalived
1dnf -y install keepalived
配置keepalived
master配置
 1vi /etc/keepalived/keepalived.conf
 2global_defs {
 3   router_id MySQL-HA
 4}
 5
 6vrrp_sync_group VG1 {
 7    group {
 8        VI_1
 9    }
10}
11
12vrrp_script check_run {
13    script "/usr/local/bin/mysql_check.sh"
14    interval 60
15}
16
17vrrp_instance VI_1 {
18    state BACKUP
19    interface eth1
20    virtual_router_id 51
21    priority 100
22    advert_int 1
23    nopreemt
24    authentication {
25        auth_type PASS
26        auth_pass 1234
27    }
28    track_script {
29        check_run
30    }
31    notify_master /usr/local/bin/mysql_master.sh
32    notify_stop   /usr/local/bin/mysql_stop.sh
33    virtual_ipaddress {
34        172.16.10.100
35    }
36}
backup配置
 1vi /etc/keepalived/keepalived.conf
 2global_defs {
 3   router_id MySQL-HA
 4}
 5
 6vrrp_script check_run {
 7    script "/usr/local/bin/mysql_check.sh"
 8    interval 60
 9}
10
11vrrp_sync_group VG1 {
12    group {
13        VI_1
14    }
15}
16
17vrrp_instance VI_1 {
18    state BACKUP
19    interface eth1
20    virtual_router_id 51
21    priority 90
22    advert_int 1
23    nopreempt
24    authentication {
25        auth_type PASS
26        auth_pass 1234
27    }
28    track_script {
29        check_run
30    }
31    notify_master /usr/local/bin/mysql_master.sh
32    notify_stop   /usr/local/bin/mysql_stop.sh
33
34    virtual_ipaddress {
35        172.16.10.100
36    }
37}
mysql_check.sh脚本
 1#!/bin/bash
 2count=1
 3
 4while true
 5do
 6  mysql -e "show status;" > /dev/null 2>&1
 7  i=$?
 8  ps aux | grep mysqld | grep -v grep > /dev/null 2>&1
 9  j=$?
10  if [ $i = 0 ] && [ $j = 0 ]
11  then
12     exit 0
13  else
14     if [ $i = 1 ] && [ $j = 0 ]
15     then
16         exit 0
17     else
18          if [ $count -gt 5 ]
19          then
20                break
21          fi
22     let count++
23     continue
24     fi
25  fi
26done
27
28/usr/bin/systemctl stop keepalived
mysql_master.sh脚本
 1#!/bin/bash
 2
 3Master_Log_File=$(mysql -e "show slave status\G" | grep -w Master_Log_File | awk -F": " '{print $2}')
 4Relay_Master_Log_File=$(mysql -e "show slave status\G" | grep -w Relay_Master_Log_File | awk -F": " '{print $2}')
 5Read_Master_Log_Pos=$(mysql -e "show slave status\G" | grep -w Read_Master_Log_Pos | awk -F": " '{print $2}')
 6Exec_Master_Log_Pos=$(mysql -e "show slave status\G" | grep -w Exec_Master_Log_Pos | awk -F": " '{print $2}')
 7
 8i=1
 9
10while true
11do
12  if [ $Master_Log_File = $Relay_Master_Log_File ] && [ $Read_Master_Log_Pos -eq $Exec_Master_Log_Pos ]
13  then
14     echo "ok"
15     break
16  else
17     sleep 1
18     if [ $i -gt 60 ]
19     then
20        break
21     fi
22     continue
23     let i++
24  fi
25done
26
27mysql -e "stop slave;"
28mysql -e "reset slave all;"
29mysql -e "reset master;"
30mysql -e "show master status;" > /tmp/master_status_$(date "+%y%m%d-%H%M").txt
mysql_stop.sh脚本
 1#!/bin/bash
 2
 3M_File1=$(mysql -e "show master status\G" | awk -F': ' '/File/{print $2}')
 4M_Position1=$(mysql -e "show master status\G" | awk -F': ' '/Position/{print $2}')
 5sleep 1
 6M_File2=$(mysql -e "show master status\G" | awk -F': ' '/File/{print $2}')
 7M_Position2=$(mysql -e "show master status\G" | awk -F': ' '/Position/{print $2}')
 8
 9i=1
10
11while true
12do
13  if [ $M_File1 = $M_File1 ] && [ $M_Position1 -eq $M_Position2 ]
14  then
15     echo "ok"
16     break
17  else
18     sleep 1
19     if [ $i -gt 60 ]
20     then
21        break
22     fi
23     continue
24     let i++
25  fi
26done
给脚本添加执行权限
1chmod +x /usr/local/bin/mysql_*.sh
在master节点运行keepalived
1systemctl enable --now keepalived
观察VIP地址:172.16.10.100在master1上
检查VIP状态
模拟master1宕机
1systemctl stop mysqld
查看master2上的keepalived日志
 1Apr 23 08:13:01 node1 Keepalived_vrrp[26863]: (VI_1) ip address associated with VRID 51 not present in MASTER advert : 172.16.10.100
 2Apr 23 08:13:02 node1 Keepalived_vrrp[26863]: (VI_1) ip address associated with VRID 51 not present in MASTER advert : 172.16.10.100
 3Apr 23 08:13:07 node1 Keepalived_vrrp[26863]: (VI_1) Master received advert from 172.16.10.10 with higher priority 100, ours 90
 4Apr 23 08:13:07 node1 Keepalived_vrrp[26863]: (VI_1) Entering BACKUP STATE
 5Apr 23 08:13:07 node1 Keepalived_vrrp[26863]: (VI_1) removing VIPs.
 6Apr 23 08:13:07 node1 Keepalived_vrrp[26863]: VRRP_Group(VG1) Syncing instances to BACKUP state
 7Apr 23 08:16:03 node1 Keepalived_vrrp[26863]: (VI_1) Backup received priority 0 advertisement
 8Apr 23 08:16:04 node1 Keepalived_vrrp[26863]: (VI_1) Receive advertisement timeout
 9Apr 23 08:16:04 node1 Keepalived_vrrp[26863]: (VI_1) Entering MASTER STATE
10Apr 23 08:16:04 node1 Keepalived_vrrp[26863]: (VI_1) setting VIPs.
11Apr 23 08:16:04 node1 Keepalived_vrrp[26863]: Sending gratuitous ARP on eth1 for 172.16.10.100
12Apr 23 08:16:04 node1 Keepalived_vrrp[26863]: (VI_1) Sending/queueing gratuitous ARPs on eth1 for 172.16.10.100
13Apr 23 08:16:04 node1 Keepalived_vrrp[26863]: Sending gratuitous ARP on eth1 for 172.16.10.100
14Apr 23 08:16:04 node1 Keepalived_vrrp[26863]: Sending gratuitous ARP on eth1 for 172.16.10.100
15Apr 23 08:16:04 node1 Keepalived_vrrp[26863]: Sending gratuitous ARP on eth1 for 172.16.10.100
16Apr 23 08:16:04 node1 Keepalived_vrrp[26863]: Sending gratuitous ARP on eth1 for 172.16.10.100
17Apr 23 08:16:04 node1 Keepalived_vrrp[26863]: VRRP_Group(VG1) Syncing instances to MASTER state
发现已经转到master2上了。
配置双主多从
双主已经实现了,直接配置172.16.10.100到172.16.10.12的主从即可
在master节点上使用mysqldump备份test数据库还原到slave1上,使用-x --master-data=1会记录mysql-bin的文件和log_pos。如下:
CHANGE MASTER TO MASTER_LOG_FILE='mysql-bin.000001', MASTER_LOG_POS=155;
1mysqldump -B test -x --master-data=1 > test.sql
2scp test.sql root@172.16.10.12:~
在slave1上操作
1mysql < test.sql
开启主从模式
 1CHANGE MASTER TO
 2 MASTER_HOST='172.16.10.100',
 3 MASTER_USER='replication',
 4 MASTER_PASSWORD='replication';
 5
 6start slave;
 7
 8show slave status\G
 9*************************** 1. row ***************************
10               Slave_IO_State: Waiting for master to send event
11                  Master_Host: 172.16.10.100
12                  Master_User: replication
13                  Master_Port: 3306
14                Connect_Retry: 60
15              Master_Log_File: mysql-bin.000001
16          Read_Master_Log_Pos: 155
17               Relay_Log_File: node2-relay-bin.000002
18                Relay_Log_Pos: 369
19        Relay_Master_Log_File: mysql-bin.000001
20             Slave_IO_Running: Yes
21            Slave_SQL_Running: Yes
再有多个slave也是这么配置。
好了,双主多从的配置就到这里。读写分离的话具体业务去实现或者使用MySQL-proxy,Atlas方案。如果是CentOS6的系统可以直接用Atlas的rpm包进行安装。我这里是CentOS8的系统,Atlas几年没更新了,这里使用MySQL-proxy,最新版本为0.8.5。
MySQL-proxy读写分离
安装MySQL-proxy
在master上安装mysql-proxy,并配置keepalived
上mysql官网下载最新版本的MySQL-proxy,目前最新版本为0.8.5
1tar xf mysql-proxy-0.8.5-linux-glibc2.3-x86-64bit.tar.gz -C /usr/local
2cd /usr/local
3mv mysql-proxy-0.8.5-linux-glibc2.3-x86-64bit mysql-proxy
4cd mysql-proxy
5mkdir conf # 配置文件目录
6mkdir lua  # 创建脚本存放目录
7mkdir logs # 创建日志目录
8cp share/doc/mysql-proxy/rw-splitting.lua lua # 复制读写分离配置文件
9cp share/doc/mysql-proxy/admin-sql.lua lua    # 复制管理脚本
配置mysql-proxy
 1vim conf/mysql-proxy.cnf
 2[mysql-proxy]
 3user = root      # 运行mysql-proxy用户
 4admin-username = proxy_user # 主从mysql共有的用户
 5admin-password = proxy_pass # 用户的密码
 6proxy-address   = :4000              # mysql-proxy运行ip和端口,默认:4040
 7proxy-read-only-backend-addresses = 172.16.10.12  # 指定后端从slave读取数据
 8proxy-backend-addresses = 172.16.10.100           # 指定后端主master写入数据
 9proxy-lua-script = /usr/local/mysql-proxy/lua/rw-splitting.lua # 指定读写分离配置文件位置
10admin-lua-script = /usr/local/mysql-proxy/lua/admin-sql.lua    # 指定管理脚本
11log-file = /usr/local/mysql-proxy/logs/mysql-proxy.log         # 日志位置
12log-level = info  # 定义log日志级别,由高到低分别有(error|warning|info|message|debug)
13daemon = true     # 以守护进程方式运行
14keepalive = true  # mysql-proxy崩溃时,尝试重启
备注
配置的时候配置文件里面尽量不要写注释,以免因解析错误导致运异常。配置文件的更多选项可以通过./bin/mysql-proxy --help-proxy和./bin/mysql-proxy --help查看。
修改配置文件权限
loading config from 'conf/mysql-proxy.cnf' failed: permissions of conf/mysql-proxy.cnf aren't secure (0660 or stricter required)
1chmod 640 conf/mysql-proxy.cnf
运行mysql-proxy
1/usr/local/mysql-proxy/bin/mysql-proxy --defaults-file=/usr/local/mysql-proxy/conf/mysql-proxy.cnf
生产环境用需要写成守护进程并做成开机启动。
检查服务运行情况
1lsof -i :4000
2COMMAND    PID USER   FD   TYPE DEVICE SIZE/OFF NODE NAME
3mysql-pro 1512 root   10u  IPv4  65361      0t0  TCP *:terabase (LISTEN)
已经运行起来,现在在master节点和slave节点创建proxy_user用户
1create user proxy_user@'172.16.10.%' identified by 'proxy_pass';
2grant all on test.* to proxy_user@'172.16.10.%';
3flush privileges;
读写分离测试
可以修改lua脚本lua/rw-splitting.lua
1-- connection pool
2if not proxy.global.config.rwsplit then
3    proxy.global.config.rwsplit = {
4            min_idle_connections = 1, # 最少1个空闲连接使用读写分离
5            max_idle_connections = 1, # 最多1个空闲连接使用读写分离
6            is_debug = false
7    }
8end
- 原文作者:黄忠德
- 原文链接:https://huangzhongde.cn/post/Linux/MySQL_High_Avaliablity_Cluster/
- 版权声明:本作品采用知识共享署名-非商业性使用-禁止演绎 4.0 国际许可协议进行许可,非商业转载请注明出处(作者,原文链接),商业转载请联系作者获得授权。